# Activate the full Loopring wallet
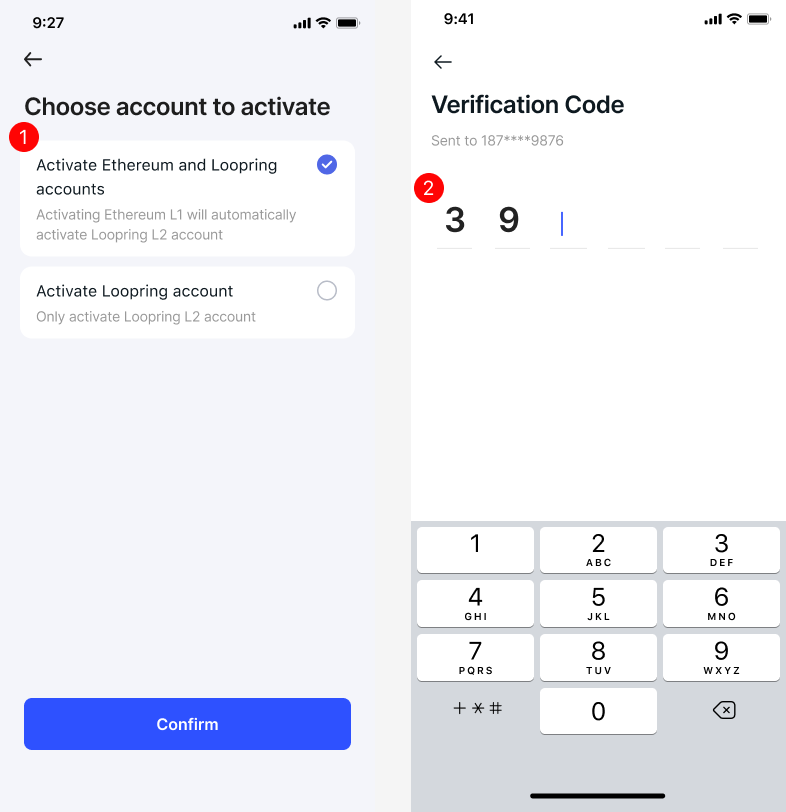
### 1. Choose to create a full Loopring Wallet and enter the verification code received to confirm
### 2. Confirm Statement
Read every statement on the page to ensure you understand how the Loopring Wallet works. If you understand and agree, please check every box to the left of the appropriate statement. Once you understand and confirm that you agree with all statements, tap the Confirm button to continue.
{% hint style="info" %}
The Loopring Wallet is a smart wallet, therefore its creation needs to call the Ethereum smart contract. Ethereum's gas fee varies depending upon network congestion. Generally, transfers consume less gas, while smart contract execution consumes more gas (the more complex the contract, the more gas consumed).
The cost of creating a wallet will vary according to the price of gwei and Ethereum at the time of creation. You’ll need to pay this fee (which is an Ethereum transaction) prior to your wallet’s creation. Any assets sent for the initial creation of the wallet to cover the fee will be converted by Loopring to ETH to pay the Ethereum miners the gas fee for the transaction. Loopring does not benefit from this conversion.
{% endhint %}
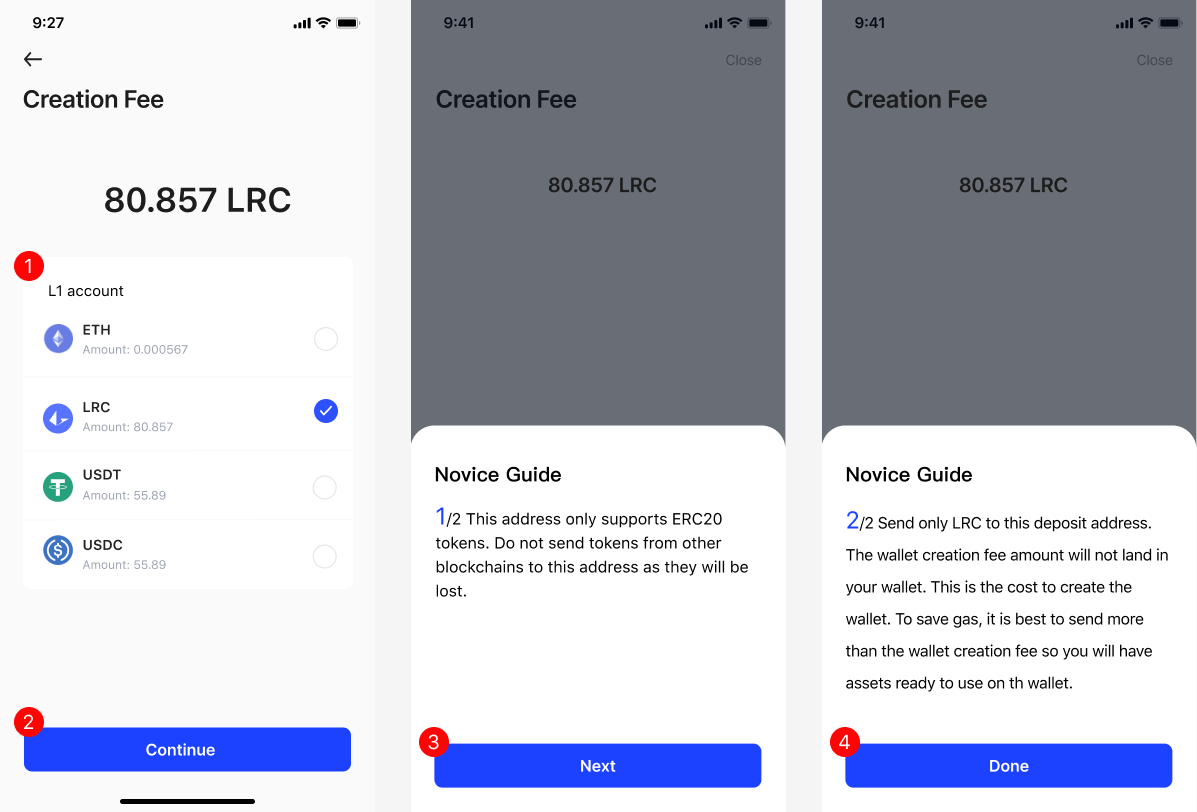
### 3. Select payment method
You need to pay the wallet creation fee before you can start creating a wallet. Loopring supports four kinds of tokens for payment: LRC, ETH, USDT and USDC.
### 4. Receive wallet address and QR code for creation payment
It is best to send your funds once in order to avoid paying multiple gas fees for multiple transfers. Consider sending the entire amount you want held in your Loopring Wallet to avoid multiple costly transactions.
After the QR code appears, you can scan it or copy the address. You will then need to send funds from your previously activated L2, a centralized exchange, fiat on-ramp provider, or another Ethereum L1 wallet – funds must be sent to the L1 account.
Transfer the necessary ERC-20 tokens to the address shown. Once the gas for the wallet creation fee is consumed, the remaining funds will be automatically deposited into your wallet’s L1 account.
{% hint style="info" %}
If the timer expires before you transfer the proper token and amount, do not delete the app. You can simply restart the activation process from the token selection screen whenever you are ready.
{% endhint %}
### 5. Create a full Loopring Wallet (L1 + L2)
After confirming payment, you need to wait for the confirmation on-chain before the assets are credited to the account. After the assets are confirmed, the wallet will automatically begin the creation process. Since this is a smart contract wallet, it may take some time to create - please be patient. After the wallet is successfully created, you will receive a SMS or email reminder.
{% hint style="success" %}
You’re on the future of Ethereum!
Congratulations! Welcome to the Loopring Smart Wallet experience and say goodbye to cumbersome private keys and seed phrases – while still retaining 100% control over your assets.
{% endhint %}
---
# Agent Instructions: Querying This Documentation
If you need additional information that is not directly available in this page, you can query the documentation dynamically by asking a question.
Perform an HTTP GET request on the current page URL with the `ask` query parameter:
```
GET https://docs-wallet.loopring.io/create-your-wallet/wallet-activation/activate-the-full-loopring-wallet.md?ask=
```
The question should be specific, self-contained, and written in natural language.
The response will contain a direct answer to the question and relevant excerpts and sources from the documentation.
Use this mechanism when the answer is not explicitly present in the current page, you need clarification or additional context, or you want to retrieve related documentation sections.